+86 15303735673
 Jessica@frpzs.com
 Technical Data

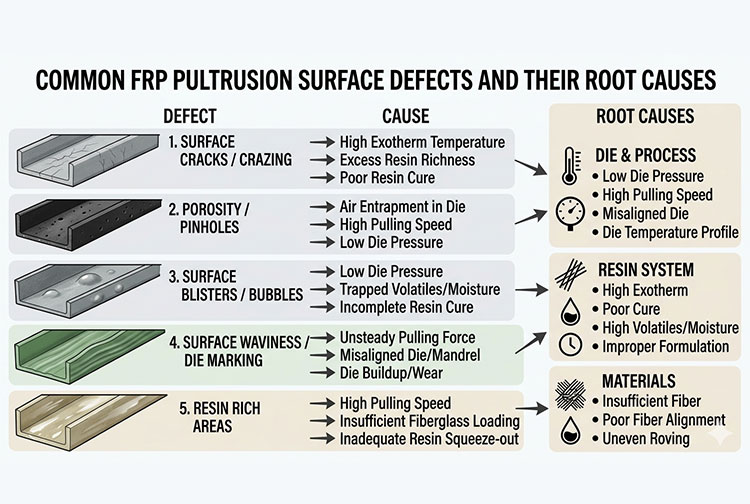
Common FRP Pultrusion Surface Defects and Their Root Causes
How to Solve Common FRP Pultrusion Surface Defects: An Expert Troubleshooting Guide
Surface quality is the most visible indicator of a well-tuned pultrusion line. Yet even experienced operators encounter defects—cracking, blistering, porosity, fiber show-through, and waviness—that can render an entire batch non-compliant. At Henan Zhongsheng Composite Material Co., Ltd, with over a decade of experience manufacturing pultrusion machines, molds, and finished profiles, we have diagnosed and resolved thousands of defect cases across dozens of production lines worldwide. This guide distills that field expertise into an actionable troubleshooting reference.
1. The Anatomy of a Pultrusion Defect
Every surface defect in the pultrusion process can be traced back to one of five root-cause categories. Understanding this framework is the key to fast diagnosis:
| Root Cause Category | Typical Symptoms | Difficulty to Fix | Frequency |
|---|---|---|---|
| Resin Formulation | Blistering, discoloration, sticky surface | Medium | High |
| Die Temperature Profile | Cracking, uneven cure, warping | High | Very High |
| Pull Speed & Tension | Fiber wash, waviness, dimension errors | Low | Very High |
| Die & Guide Wear | Scratches, surface roughness, flash | High | Medium |
| Fiber Impregnation | Dry spots, porosity, delamination | Medium | High |
2. Defect #1 — Surface Cracking (The Most Common Problem)
Surface cracks typically appear as longitudinal fissures running parallel to the pull direction. They are the single most reported defect in FRP pultrusion and usually indicate an imbalance between cure kinetics and thermal gradients.
Root Cause Analysis
- Excessive heating zone temperature: If Zone 2 (mid-die) is too hot, the resin cures too rapidly, generating internal stresses that crack as the profile cools.
- Pull speed too fast: The resin does not have sufficient residence time to cure evenly, leaving a brittle, cracked skin.
- Sharp temperature transition: A large delta between Zone 1 (entry) and Zone 2 causes thermal shock in the resin matrix.
- Inadequate resin toughness: Some formulations are inherently brittle (e.g., high-styrene vinyl esters at low temperatures).
Solution Protocol
| Step | Action | Target Parameter |
|---|---|---|
| 1 | Reduce Zone 2 temperature by 5-10°C | 140-155°C (typical for polyester) |
| 2 | Decrease pull speed by 10-15% | Monitor until cracks disappear |
| 3 | Smooth the temperature gradient between zones | Delta < 20°C between adjacent zones |
| 4 | Add flexibilizer to resin (if applicable) | 1-3% by weight |
Case Study: Pipe Profile Cracking Eliminated in 2 Hours
A Malaysian GRP pipe manufacturer was experiencing longitudinal cracking on 50mm round tubes at 0.8 m/min. Our engineers identified an aggressive Zone 2 setting of 175°C and a 30°C gradient from Zone 1. By reducing Zone 2 to 155°C, raising Zone 1 to 135°C, and lowering pull speed to 0.65 m/min, the cracks were completely eliminated. Production speed was later optimized back to 0.75 m/min after fine-tuning the resin catalyst ratio.
3. Defect #2 — Blistering & Voids
Blisters appear as raised bubbles or pockmarks on the profile surface. They are caused by trapped volatiles (styrene vapor, moisture, air) that expand during the exothermic cure reaction and cannot escape through the cured resin skin.
Root Cause Analysis
- Moisture in raw materials: Glass fiber roving stored in humid conditions absorbs moisture, which vaporizes inside the die.
- Excessive initiator/peroxide: Over-catalyzed resin cures too fast, trapping volatiles before they can diffuse out.
- Insufficient die entry pressure: Low impregnation pressure allows air entrapment in the resin bath.
- Cold die surface: If Zone 1 is too cold, the resin viscosity remains high near the die wall, sealing volatiles inside.
Solution Protocol
- Pre-dry glass fiber: Store roving in a climate-controlled environment (RH < 50%) or pre-dry at 80-100°C for 2-4 hours before production.
- Reduce peroxide content: Lower MEKP or TBPB initiator by 5-10% and compensate with a slightly increased die temperature.
- Increase die entry temperature: Raise Zone 1 by 5-10°C to lower resin viscosity at the die entrance, allowing volatiles to escape.
- Add a vacuum impregnation zone: For critical profiles, a vacuum-assisted resin impregnation system removes entrapped air before the die entry.
4. Defect #3 — Fiber Show-Through (Poor Surface Finish)
Fiber show-through manifests as visible glass fiber texture on the profile surface, giving it a rough, “hairy” appearance. This defect is primarily a resin content and impregnation issue.
Root Cause Analysis
- Insufficient resin pickup: The fiber package is not absorbing enough resin in the bath, resulting in a resin-starved surface.
- High pull speed: Excessive speed reduces residence time in the resin bath, limiting impregnation.
- Incorrect fiber architecture: Using a predominantly unidirectional (UD) roving without surface mats or veils leaves no resin-rich layer on the surface.
- Low resin viscosity: Overheated or under-filled resin drains away from the surface before gelation.
Solution Protocol
- Add a surface veil or mat: A thin C-glass or synthetic veil (10-30 g/m²) on the outer surface creates a resin-rich cosmetic layer that eliminates fiber show-through entirely.
- Optimize resin bath level and guide positioning: Ensure full submersion of the fiber package. Adjust preform guides to maintain proper fiber spread.
- Increase resin viscosity slightly: Raise bath temperature by 3-5°C or use a thixotropic additive (fumed silica 1-2%) to retain resin on vertical surfaces.
5. Defect #4 — Dimensional Inaccuracy & Warping
Profiles that do not meet specified tolerances or exhibit bending, twisting, or bowing are often rejected entirely. This is particularly critical for structural profiles such as I-beams, channels, and angle sections.
| Defect Type | Cause | Solution |
|---|---|---|
| Undersized | Excessive resin shrinkage or worn die | Replace die; reduce low-shrink additives |
| Oversized | Insufficient cure, flash buildup | Increase Zone 3 temp; clean die lands |
| Bowing / Curvature | Asymmetric fiber layup or uneven die heating | Balance fiber placement; check die thermocouples |
| Twisting | Non-uniform pull speed or misaligned creels | Recalibrate puller alignment; check gripping pressure |
6. Die Maintenance: Prevention is Cheaper Than Cure
Many surface defects can be traced directly to die condition. A well-maintained pultrusion die is the foundation of consistent product quality.
- Daily: Wipe die entrance with acetone to remove resin buildup. Inspect die lands for flash accumulation.
- Weekly: Polish die surfaces with fine abrasive (600-1000 grit) to maintain mirror finish. Check all heating zones for uniformity.
- Monthly: Measure critical dimensions and compare to specifications. If deviation exceeds 0.05mm, consider die rework or replacement.
- Annually: Full die inspection including hardness testing (HRC 55-62 recommended) and chrome layer integrity check (minimum 0.05mm for corrosion resistance).
Pro Tip: Die Coating Matters
At Henan Zhongsheng, our standard pultrusion dies feature a hardened steel body with chrome plating (0.08-0.15mm) for corrosion resistance and easy release. For high-abrasion applications (e.g., carbon fiber profiles), we offer tungsten carbide or DLC (Diamond-Like Carbon) coatings that extend die life by 3-5x compared to standard chrome.
7. Quick-Reference Troubleshooting Flowchart
Use this decision tree when a defect appears on the line:
- Visible cracks? → Check die temperature gradient first, then pull speed.
- Blisters or bubbles? → Check material moisture, then initiator level.
- Rough / hairy surface? → Check resin content, add surface veil.
- Wrong dimensions? → Check die condition, then cure degree.
- Bending or twisting? → Check fiber balance, then puller alignment.
- Discoloration (yellowing)? → Check die temperature (too high), then resin stability.
“In 80% of the defect cases we troubleshoot for clients, the root cause is not the machine—it is the process parameter mismatch between resin, temperature, and speed. A systematic approach to parameter tuning solves most issues within a single shift.”
Engineering Support & Compliance
All Henan Zhongsheng pultrusion machines and molds are designed to comply with ISO 9001:2015 quality management standards. Our dies are manufactured from pre-hardened 4Cr13 or P20 steel with precision CNC machining to tolerances of ±0.02mm. We provide full process parameter sheets and startup guidance for every equipment shipment.
Experiencing Persistent Pultrusion Defects?
Our engineering team offers free remote diagnostics for your pultrusion line. Send us photos of the defect and your current process parameters—we will identify the root cause and recommend a solution within 24 hours. For on-site support, our technicians are available for deployment worldwide.
Explore Our Tech: www.frpzs.com
Frequently Asked Questions (FAQ)
Q: How often should I replace a pultrusion die?
A: With proper maintenance, a chrome-plated steel die typically lasts 20,000-50,000 linear meters depending on the profile complexity and resin abrasiveness. Tungsten carbide or DLC-coated dies can exceed 100,000 meters.
Q: Can defects be repaired on finished profiles?
A: Surface cracks and blisters cannot be structurally repaired. Minor fiber show-through can be addressed with a post-cure coating or gel coat, but this adds cost. Prevention is always more economical than repair.
Q: What is the ideal die temperature for polyester resin?
A: A typical 3-zone profile is: Zone 1 (entry): 110-130°C, Zone 2 (mid): 140-160°C, Zone 3 (exit): 150-170°C. Exact values depend on resin system, profile thickness, and line speed.
Q: Does the type of glass fiber affect surface quality?
A: Yes. E-glass is standard and produces good results. ECR-glass offers better acid resistance. For premium surface finish, C-glass veils or synthetic (polyester) veils provide the smoothest cosmetic surface.